![]() Beginning in the year 1807, Jacob Peter Schmitt, the youngest son of Jacob And Rosana Schmitt, was listed on the Greenfield Township, Bedford County tax assessment return as one. In 1814 Henry Walter began to be listed on the tax assessment returns for Greenfield Township as one. By the time that the Triennial Assessment was taken in 1823, Jacob Peter Schmitt had passed away and Henry Walter had apparently given up his profession. In 1823, two new individuals, Thomas Dodson and Benjamin Good, were listed on the tax return as coopers. The following information will describe how these men made their living.
Beginning in the year 1807, Jacob Peter Schmitt, the youngest son of Jacob And Rosana Schmitt, was listed on the Greenfield Township, Bedford County tax assessment return as one. In 1814 Henry Walter began to be listed on the tax assessment returns for Greenfield Township as one. By the time that the Triennial Assessment was taken in 1823, Jacob Peter Schmitt had passed away and Henry Walter had apparently given up his profession. In 1823, two new individuals, Thomas Dodson and Benjamin Good, were listed on the tax return as coopers. The following information will describe how these men made their living.
![]() The word cooper comes from kuper, a lower saxon word meaning "a tub", and was conferred on one who makes tubs, along with casks, barrels and similar items. It has been suggested that the idea of containing liquids inside a vessel constructed of wooden staves or slats arose from the shipbuilding industry. In the days of ships that were constructed of wood, the idea was to fit wooden boards tightly together so that the liquid of the ocean waters would be kept out. Someone must have looked at that and realized that if you could keep the ocean water out of a wooden ship, you might likewise keep liquids inside a similarly constructed wooden vessel.
The word cooper comes from kuper, a lower saxon word meaning "a tub", and was conferred on one who makes tubs, along with casks, barrels and similar items. It has been suggested that the idea of containing liquids inside a vessel constructed of wooden staves or slats arose from the shipbuilding industry. In the days of ships that were constructed of wood, the idea was to fit wooden boards tightly together so that the liquid of the ocean waters would be kept out. Someone must have looked at that and realized that if you could keep the ocean water out of a wooden ship, you might likewise keep liquids inside a similarly constructed wooden vessel.
![]() In a day and age when zip-lock plastic bags and tupperware were not known, the cooper produced containers in which were stored both dry items and liquids. Dry items, such as grains, or ground flour and corn meal were stored in what were called dry or slack casks. Wet casks were used for storage of liquids such as distilled liquors and beer, cider and molasses in addition to salted meat and fish. Smaller kegs were used to store gunpowder.
In a day and age when zip-lock plastic bags and tupperware were not known, the cooper produced containers in which were stored both dry items and liquids. Dry items, such as grains, or ground flour and corn meal were stored in what were called dry or slack casks. Wet casks were used for storage of liquids such as distilled liquors and beer, cider and molasses in addition to salted meat and fish. Smaller kegs were used to store gunpowder.
![]() It might be noted that in the foregoing paragraph, instead of the word, barrel, the word, cask, was used to describe the vessel in which dry or liquid items might be stored. The barrel was only one of seven measurements of casks, the knowledge of which the cooper would have been adept. The smallest measure was the pin, which held four and one half (4-1/2) gallons. The firkin was next, holding nine (9) gallons. Next came the kilderkin, which held eighteen (18) gallons. The barrel held thirty-six(36) gallons. It was followed by the hogshead, which held fifty-four (54) gallons, and it by the puncheon, which held seventy-two (72) gallons. And finally there was the butt, which was designed to hold a whopping one hundred and eight (108) gallons. Although there were unique casks of greater size, such as the notable "Great Tun of Heidelberg" constructed in 1751, which was reknown to have held over fifty-five thousand (55,000) gallons, these were the standard and traditional sized casks.
It might be noted that in the foregoing paragraph, instead of the word, barrel, the word, cask, was used to describe the vessel in which dry or liquid items might be stored. The barrel was only one of seven measurements of casks, the knowledge of which the cooper would have been adept. The smallest measure was the pin, which held four and one half (4-1/2) gallons. The firkin was next, holding nine (9) gallons. Next came the kilderkin, which held eighteen (18) gallons. The barrel held thirty-six(36) gallons. It was followed by the hogshead, which held fifty-four (54) gallons, and it by the puncheon, which held seventy-two (72) gallons. And finally there was the butt, which was designed to hold a whopping one hundred and eight (108) gallons. Although there were unique casks of greater size, such as the notable "Great Tun of Heidelberg" constructed in 1751, which was reknown to have held over fifty-five thousand (55,000) gallons, these were the standard and traditional sized casks.
![]() Now all casks, no matter what size, were constructed in the same way. Six steps were primarily involved in the construction of a cask: 1.) Flat boards would be cut and shaped into staves; 2.) The staves would be positioned and connected together; 3.) Grooves would be cut into the staves at each end, into which the heads would be fitted; 4.) The heads of the cask would be cut and pounded into the grooves; 5.) The permanent hoops would be fitted and attached; and 6.) The spy hole would be drilled and fitted with spigots and/or plugs.
Now all casks, no matter what size, were constructed in the same way. Six steps were primarily involved in the construction of a cask: 1.) Flat boards would be cut and shaped into staves; 2.) The staves would be positioned and connected together; 3.) Grooves would be cut into the staves at each end, into which the heads would be fitted; 4.) The heads of the cask would be cut and pounded into the grooves; 5.) The permanent hoops would be fitted and attached; and 6.) The spy hole would be drilled and fitted with spigots and/or plugs.
![]() Cutting and shaping a flat board into a cask stave was not an easy task for most people. A young man who apprenticed to a cooper would spend up to four years learning the craft. No one ever came up with a mathematical formula for shaping the perfect stave. The professional cooper would work the stave until he ‘felt’ it was right. One would reach that point of knowledge of the craft only after years of apprenticeship.
Cutting and shaping a flat board into a cask stave was not an easy task for most people. A young man who apprenticed to a cooper would spend up to four years learning the craft. No one ever came up with a mathematical formula for shaping the perfect stave. The professional cooper would work the stave until he ‘felt’ it was right. One would reach that point of knowledge of the craft only after years of apprenticeship.
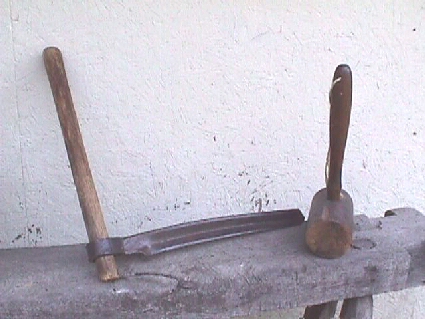
![]() The cutting and shaping of the stave was started by cutting a board to the proper thickness, width and length. In a day and age when you couldn’t just drive to a local lumber supply business to buy ready cut boards, you needed to cut your own boards from a section of a tree trunk. That involved first crosscutting a tree trunk into the approximate length the cooper wanted the staves to be. Then the tree trunk section would be set upright on the ground and using a froe and mallet, the cooper would, in effect, chisel boards out of the wood. The froe was essentially a long piece of metal sharpened along the one edge and held upright by a handle that was attached at one end, perpendicular to the cutting edge, as shown in the following illustration. The cooper would position the froe’s cutting edge on the section of tree trunk, and using a wood mallet, strike down on the top edge of the froe. It cut into the wood in the manner of a wide chisel. This action was called riving. The cooper didn’t always do the riving himself. In many cases, the farmer who wanted a cask made might rive the boards, producing enough for his own cask along with enough others to pay for the cooper’s labor.
The cutting and shaping of the stave was started by cutting a board to the proper thickness, width and length. In a day and age when you couldn’t just drive to a local lumber supply business to buy ready cut boards, you needed to cut your own boards from a section of a tree trunk. That involved first crosscutting a tree trunk into the approximate length the cooper wanted the staves to be. Then the tree trunk section would be set upright on the ground and using a froe and mallet, the cooper would, in effect, chisel boards out of the wood. The froe was essentially a long piece of metal sharpened along the one edge and held upright by a handle that was attached at one end, perpendicular to the cutting edge, as shown in the following illustration. The cooper would position the froe’s cutting edge on the section of tree trunk, and using a wood mallet, strike down on the top edge of the froe. It cut into the wood in the manner of a wide chisel. This action was called riving. The cooper didn’t always do the riving himself. In many cases, the farmer who wanted a cask made might rive the boards, producing enough for his own cask along with enough others to pay for the cooper’s labor.
![]() The following drawing shows the way that the boards would be split out of the tree trunk section in order to make the most use of the wood while making certain that the staves would be of the best quality. The hardest part of the tree trunk, the innermost core, along with the softest part, the outer layers, would not be utilized for the staves. That part between the core and the outer layers would be the most uniform in grain and easiest to shape without later distortion as the wood dried.
The following drawing shows the way that the boards would be split out of the tree trunk section in order to make the most use of the wood while making certain that the staves would be of the best quality. The hardest part of the tree trunk, the innermost core, along with the softest part, the outer layers, would not be utilized for the staves. That part between the core and the outer layers would be the most uniform in grain and easiest to shape without later distortion as the wood dried.
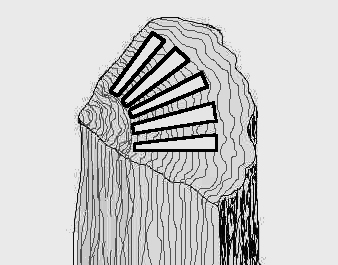
![]() By riving boards out of the tree trunk as shown above, at least one medullary ray of the grain would be found in each stave. The term medullary ray refers to the strong fibers that extend from the pith to the surface.
By riving boards out of the tree trunk as shown above, at least one medullary ray of the grain would be found in each stave. The term medullary ray refers to the strong fibers that extend from the pith to the surface.
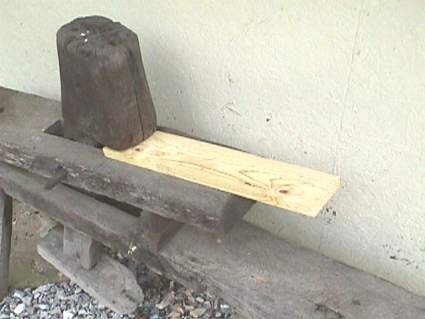
![]() The next step involved placing a single board with one end positioned in the jaw of a shaving (or shingle) horse to be shaped.
The next step involved placing a single board with one end positioned in the jaw of a shaving (or shingle) horse to be shaped.
![]() The shaving horse was a wooden bench specially designed to function as a vise, work-bench and seat, all in one. The illustrations that follow show a shaving horse with the 'jaw' closed and then open and ready to accept a board.
The shaving horse was a wooden bench specially designed to function as a vise, work-bench and seat, all in one. The illustrations that follow show a shaving horse with the 'jaw' closed and then open and ready to accept a board.
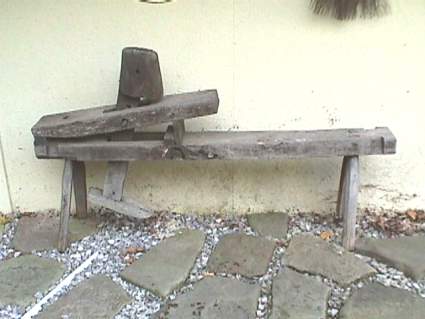
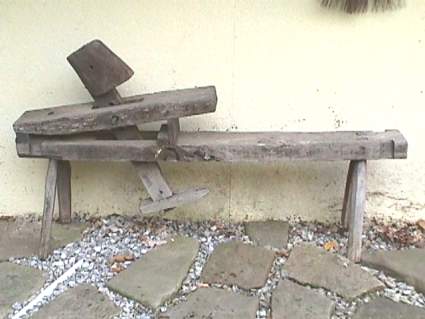
![]() The cooper would sit on the horizontal plank ‘seat’ of the shaving horse, facing the ‘jaw’. He would place one of his feet onto the ‘foot’ of the shaving horse and, by extending his leg straight, push the foot forward. The harder he pushed on the foot, the more tightly the jaw clamped down.
The cooper would sit on the horizontal plank ‘seat’ of the shaving horse, facing the ‘jaw’. He would place one of his feet onto the ‘foot’ of the shaving horse and, by extending his leg straight, push the foot forward. The harder he pushed on the foot, the more tightly the jaw clamped down.
![]() The piece of wood was held as tight in the shaving horse as it might have been in a bench vice, but it had some advantages over a bench vice.
The piece of wood was held as tight in the shaving horse as it might have been in a bench vice, but it had some advantages over a bench vice.
![]() Although it might appear crude at first glance, the design of the shaving horse was sophisticated in terms of ergonomics. The bench allowed the cooper to sit while performing this portion of the work. The upward slanting angle of the plank which formed the bottom part of the shaving horse’s ‘jaw’ was suited to pulling a drawknife toward the body without much effort and without causing excessive pain to the shoulders and elbows. And the operation of the jaw, by pushing on the foot, allowed the jaw to be opened and closed as needed to reposition the board easily and quickly.
Although it might appear crude at first glance, the design of the shaving horse was sophisticated in terms of ergonomics. The bench allowed the cooper to sit while performing this portion of the work. The upward slanting angle of the plank which formed the bottom part of the shaving horse’s ‘jaw’ was suited to pulling a drawknife toward the body without much effort and without causing excessive pain to the shoulders and elbows. And the operation of the jaw, by pushing on the foot, allowed the jaw to be opened and closed as needed to reposition the board easily and quickly.
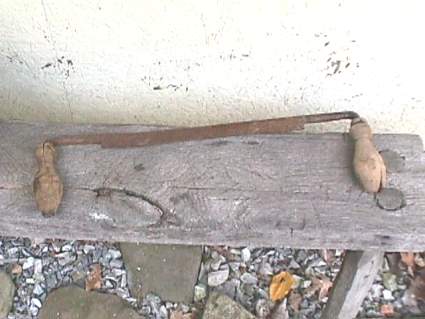
![]() The cooper used drawknives to shave off thin slivers of the wood; a wide, slightly curved one (sometimes called a heading knife) for the outside surface, and a narrow, sharply curved one (sometimes called a hollowing knife) for the inside. The illustration that follows shows a heading drawknife that would have been used for shaving the outside surface of the stave.
The cooper used drawknives to shave off thin slivers of the wood; a wide, slightly curved one (sometimes called a heading knife) for the outside surface, and a narrow, sharply curved one (sometimes called a hollowing knife) for the inside. The illustration that follows shows a heading drawknife that would have been used for shaving the outside surface of the stave.
![]() As long as the piece of wood chosen for the stave was fine grained and clean of knots (which is one reason why oak was the wood of choice used for casks), and the drawknife was sharpened, the job of shaping the stave would go smoothly and quickly for the experienced cooper.
As long as the piece of wood chosen for the stave was fine grained and clean of knots (which is one reason why oak was the wood of choice used for casks), and the drawknife was sharpened, the job of shaping the stave would go smoothly and quickly for the experienced cooper.
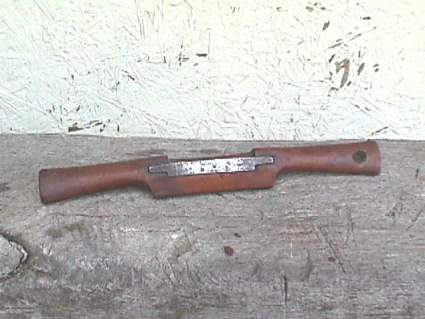
![]() The side of the board that would become the outside surface of the stave was shaved to a convex curve, while the side that would become the inside surface was shaved to a concave curve. Then both of the long edges would be tapered slightly toward the ends. That part of the job was usually performed by sliding the board over a cooper’s jointer, which was essentially a large block plane set upside down so that the blade projected upwards. The initial tapering of the ends, commonly called listing, might also be accomplished by the use of a short handled side ax. The side ax was called that because only one side of its blade, like a chisel, was sharpened. After the angle of the taper was work out with the side ax, the stave would be slid across the jointer to even up the edge’s surface. As the edges were being shaped, they would also be slightly beveled, or rather cut on a chamfer, so that they would all fit tightly together when placed side by side in a circle. As the work of shaping the staves progressed, and a greater degree of control was needed in shaving the edges for a tight fit, a tool called a spokeshave would be used. The spoke-shave, as shown in the following illustration, was essentially a drawknife that was small and more manageable.
The side of the board that would become the outside surface of the stave was shaved to a convex curve, while the side that would become the inside surface was shaved to a concave curve. Then both of the long edges would be tapered slightly toward the ends. That part of the job was usually performed by sliding the board over a cooper’s jointer, which was essentially a large block plane set upside down so that the blade projected upwards. The initial tapering of the ends, commonly called listing, might also be accomplished by the use of a short handled side ax. The side ax was called that because only one side of its blade, like a chisel, was sharpened. After the angle of the taper was work out with the side ax, the stave would be slid across the jointer to even up the edge’s surface. As the edges were being shaped, they would also be slightly beveled, or rather cut on a chamfer, so that they would all fit tightly together when placed side by side in a circle. As the work of shaping the staves progressed, and a greater degree of control was needed in shaving the edges for a tight fit, a tool called a spokeshave would be used. The spoke-shave, as shown in the following illustration, was essentially a drawknife that was small and more manageable.
![]() With the completion of the task of listing and bevelling the staves, the first part of the job of constructing a cask was finished. It was then time to start on the second part, which was the position-ing and connecting together all the staves.
With the completion of the task of listing and bevelling the staves, the first part of the job of constructing a cask was finished. It was then time to start on the second part, which was the position-ing and connecting together all the staves.
![]() The cooper held a metal hoop, referred to as the raising up hoop, in one hand at a distance off the floor almost the length of the staves. With the other hand, he placed one stave after another in a circle inside the hoop. The procedure is one that could only be accomplished by practice. In the hands of an inexperienced person, the staves would probably fly all over the place before the circle could be completed. But the cooper, through his many years of apprenticeship, would become dextrous enough to accomplish this part of the job with ease.
The cooper held a metal hoop, referred to as the raising up hoop, in one hand at a distance off the floor almost the length of the staves. With the other hand, he placed one stave after another in a circle inside the hoop. The procedure is one that could only be accomplished by practice. In the hands of an inexperienced person, the staves would probably fly all over the place before the circle could be completed. But the cooper, through his many years of apprenticeship, would become dextrous enough to accomplish this part of the job with ease.
![]() With the staves all in position, and loosely encircled by the raising up hoop, the cooper would push down on the hoop with his hands to effect the first tightening of the staves. At this point, the staves would still be basically straight boards, albeit shaped slightly. A larger hoop, called the dingee hoop, would be pushed down over the opposite end of the circle of staves to hold them together until the staves would be bent into the bulging side cask shape.
With the staves all in position, and loosely encircled by the raising up hoop, the cooper would push down on the hoop with his hands to effect the first tightening of the staves. At this point, the staves would still be basically straight boards, albeit shaped slightly. A larger hoop, called the dingee hoop, would be pushed down over the opposite end of the circle of staves to hold them together until the staves would be bent into the bulging side cask shape.
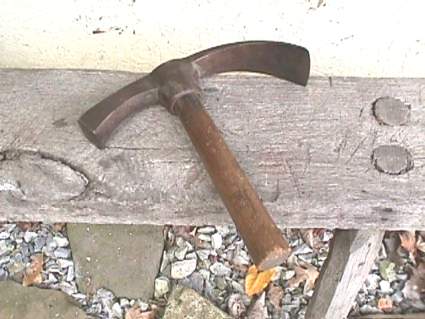
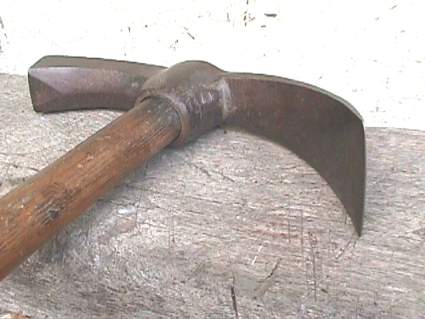
![]() To bend the staves into the characteristic bulging shape, they needed to be made malleable. That was accomplished by softening the wood by heat or steam. Heavy iron hoops called truss hoops would be pushed down over the ends of the staves held together by the raising up hoop. This is where the adze came handy. The adze used by a cooper, as shown in the following illustration, was similar to other adzes, having a sharpened blade set at a right angle to the handle. The primary difference between the cooper's adze and other such tools was the degree of the curve of the so-called colt's foot blade.
To bend the staves into the characteristic bulging shape, they needed to be made malleable. That was accomplished by softening the wood by heat or steam. Heavy iron hoops called truss hoops would be pushed down over the ends of the staves held together by the raising up hoop. This is where the adze came handy. The adze used by a cooper, as shown in the following illustration, was similar to other adzes, having a sharpened blade set at a right angle to the handle. The primary difference between the cooper's adze and other such tools was the degree of the curve of the so-called colt's foot blade.
![]() Using the poll head of the adze to hammer the truss hoops down over the staves gave a much tighter hold than the cooper could achieve by pushing them on with his hands. The cooper would then wet the cask's staves. A fire was made in a container over which the cask could be positioned. The heat on the wet staves would make them malleable enough to draw together the loose ends opposite those originally held by the raising up and the truss hoops. The cooper used a windlass with hemp ropes to pull the steamed staves together so that truss hoops could be forced down over the ends. The cask was then left to cool and dry, and during that process the wood became 'set'. The dried cask was now referred to as a gun.
Using the poll head of the adze to hammer the truss hoops down over the staves gave a much tighter hold than the cooper could achieve by pushing them on with his hands. The cooper would then wet the cask's staves. A fire was made in a container over which the cask could be positioned. The heat on the wet staves would make them malleable enough to draw together the loose ends opposite those originally held by the raising up and the truss hoops. The cooper used a windlass with hemp ropes to pull the steamed staves together so that truss hoops could be forced down over the ends. The cask was then left to cool and dry, and during that process the wood became 'set'. The dried cask was now referred to as a gun.
![]() The third step in the process of making the cask was now ready to begin. That step included the finishing of the ends, and the cutting of the grooves into the inside surface of the staves into which the heads would forced.
The third step in the process of making the cask was now ready to begin. That step included the finishing of the ends, and the cutting of the grooves into the inside surface of the staves into which the heads would forced.
![]() The ends of the cask were called the chimes, (or, variously chines) and the process of bevelling and finishing the chimes was called chiming. Using the adze, the cooper would begin to chop off bits of the ends of the staves to form a bevelled edge angled toward the inside of the cask. The cooper could only do so fine a job with the adze; to finish the edge more finely, he would use a topping plane. The topping plane was similar to a normal block plane, but with a body that was curved like the edge that it would be used on.
The ends of the cask were called the chimes, (or, variously chines) and the process of bevelling and finishing the chimes was called chiming. Using the adze, the cooper would begin to chop off bits of the ends of the staves to form a bevelled edge angled toward the inside of the cask. The cooper could only do so fine a job with the adze; to finish the edge more finely, he would use a topping plane. The topping plane was similar to a normal block plane, but with a body that was curved like the edge that it would be used on.
![]() The groove, into which the head would be positioned, was called a croze, because it was cut with a tool called a croze. The croze tool was a small block plane sized and shaped to accomodate the convex shape of the inside of the cask. The croze’s cutting blade, actually two blades, the hawk and the lance, cut a channel in the form of a ‘V’ into the staves. After the first croze was cut, the cooper would check the size of the cask in process to make sure that it would have the proper capacity desired. He would use a pair of dividers, called the diagonals, to take the measurement. The capacity could be adjusted at this point, if necessary, by altering the spacing of the opposite head.
The groove, into which the head would be positioned, was called a croze, because it was cut with a tool called a croze. The croze tool was a small block plane sized and shaped to accomodate the convex shape of the inside of the cask. The croze’s cutting blade, actually two blades, the hawk and the lance, cut a channel in the form of a ‘V’ into the staves. After the first croze was cut, the cooper would check the size of the cask in process to make sure that it would have the proper capacity desired. He would use a pair of dividers, called the diagonals, to take the measurement. The capacity could be adjusted at this point, if necessary, by altering the spacing of the opposite head.
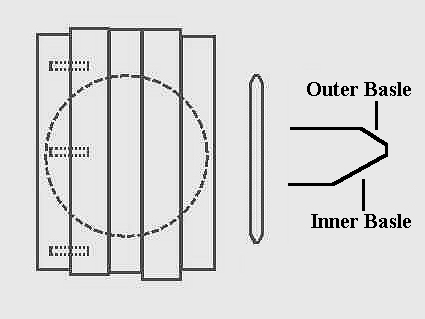
![]() The fourth step in the process of construct-ing a cask was the making and installing of the heads. Between four and six flat boards would be fastened together on edge by dowel pins to form a wide enough piece from which to cut out each head. Between the flat boards, the cooper would place flagging, or rush, to act as gasketing material. The cooper would then measure the diameter of the croze, the groove he had cut with the croze. The radius of the head would measure one sixth the circumference of the groove. He would then draw a circle with a radius of that size onto the connected boards, and cut the head out with a bow saw. The edge of the head would then be evened up by the use of the adze, drawknives or plane. As part of the process of smoothing the edge of the head, a double bevel, known as the basle, would be shaved into the edge.
The fourth step in the process of construct-ing a cask was the making and installing of the heads. Between four and six flat boards would be fastened together on edge by dowel pins to form a wide enough piece from which to cut out each head. Between the flat boards, the cooper would place flagging, or rush, to act as gasketing material. The cooper would then measure the diameter of the croze, the groove he had cut with the croze. The radius of the head would measure one sixth the circumference of the groove. He would then draw a circle with a radius of that size onto the connected boards, and cut the head out with a bow saw. The edge of the head would then be evened up by the use of the adze, drawknives or plane. As part of the process of smoothing the edge of the head, a double bevel, known as the basle, would be shaved into the edge.
![]() Before the heads were fitted into the crozes, the bunghole was drilled into one of them. The bunghole would be located near one of the ends of the center board, of which the head was constructed. The bunghole's location was important because it would be used to maneuver the head into place. Although it was stated that the bunghole would be 'drilled' into the one head, it was not drilled as one would today. Rather, the hole was bored out with a regular cross-handled auger. The hole was then reamed to a taper using a pod auger. The taper would later allow a tapered stopper or plug to be tightened into the hole.
Before the heads were fitted into the crozes, the bunghole was drilled into one of them. The bunghole would be located near one of the ends of the center board, of which the head was constructed. The bunghole's location was important because it would be used to maneuver the head into place. Although it was stated that the bunghole would be 'drilled' into the one head, it was not drilled as one would today. Rather, the hole was bored out with a regular cross-handled auger. The hole was then reamed to a taper using a pod auger. The taper would later allow a tapered stopper or plug to be tightened into the hole.
![]() The heads were installed into the croze grooves in two manners. The cask, consisting of the staves held together by the truss hoops, would be stood upright. The hoops on the end resting on the floor would be loosened slightly. The head which did not have the bunghole bored into it, now called the bottom head, would be introduced into the center of the staves and positioned on the verge of going into the groove. It then would be tapped into the croze groove from inside the cask, and the truss hoop would be re-tightened.
The heads were installed into the croze grooves in two manners. The cask, consisting of the staves held together by the truss hoops, would be stood upright. The hoops on the end resting on the floor would be loosened slightly. The head which did not have the bunghole bored into it, now called the bottom head, would be introduced into the center of the staves and positioned on the verge of going into the groove. It then would be tapped into the croze groove from inside the cask, and the truss hoop would be re-tightened.
![]() The other head, the top head, would be installed in a slightly different manner. The truss hoop on the end into which the top head would go would be loosened. The cooper would then push the head into the center of the staves, and using a tool called a heading vice, which was essentially a metal handle that was stuck into the bunghole, he would pull upward on the head. The staves would give just enough for the head to pop into place into the croze groove. The truss hoop would be re-tightened on that end also.
The other head, the top head, would be installed in a slightly different manner. The truss hoop on the end into which the top head would go would be loosened. The cooper would then push the head into the center of the staves, and using a tool called a heading vice, which was essentially a metal handle that was stuck into the bunghole, he would pull upward on the head. The staves would give just enough for the head to pop into place into the croze groove. The truss hoop would be re-tightened on that end also.
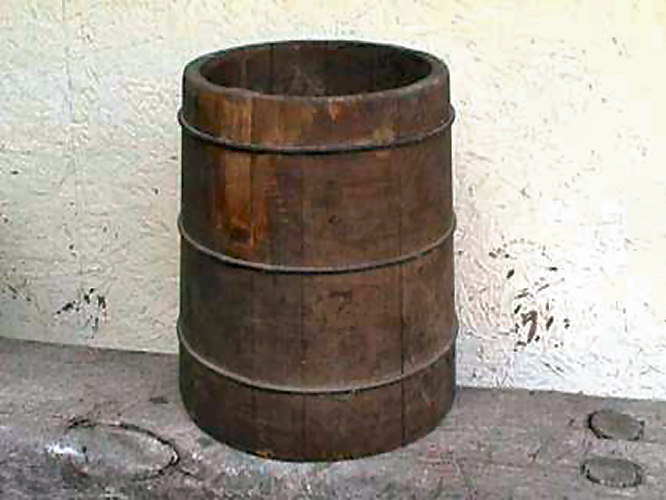
![]() With both heads in place, the construction of the cask was mostly completed. The sturdy truss hoops would now be removed one by one and the cask would be given a final planing or sanding where needed before each permanent hoop was installed. The cooper normally made his own permanent hoops out of dished steel stripping. The measuring for the hoops was not very scientific; it didn't need to be. The cooper would wrap a length of the stripping around the cask at the position it would eventually be installed, and holding his thumb on the spot where the one end crossed over on itself, he would hammer in a rivet. Then the hoops would be placed over the staves and hammered into place using a hammer and driver, a chisel like tool. The cooper usually installed two hoops on each end of the cask if it was small; casks from the 36 gallon barrel to those larger might require three hoops on each end.
With both heads in place, the construction of the cask was mostly completed. The sturdy truss hoops would now be removed one by one and the cask would be given a final planing or sanding where needed before each permanent hoop was installed. The cooper normally made his own permanent hoops out of dished steel stripping. The measuring for the hoops was not very scientific; it didn't need to be. The cooper would wrap a length of the stripping around the cask at the position it would eventually be installed, and holding his thumb on the spot where the one end crossed over on itself, he would hammer in a rivet. Then the hoops would be placed over the staves and hammered into place using a hammer and driver, a chisel like tool. The cooper usually installed two hoops on each end of the cask if it was small; casks from the 36 gallon barrel to those larger might require three hoops on each end.
![]() It should be noted that the use of metal stripping for the permanent hoops became popular only after 1800. Prior to that time the permanent hoops were composed of thin strips of either chestnut or hickory. The strips would be notched near both ends so that the ends could be interlocked. Then the ends would be tucked in and the hoop would be tapped tightly onto the cask..
It should be noted that the use of metal stripping for the permanent hoops became popular only after 1800. Prior to that time the permanent hoops were composed of thin strips of either chestnut or hickory. The strips would be notched near both ends so that the ends could be interlocked. Then the ends would be tucked in and the hoop would be tapped tightly onto the cask..
![]() The final step was the boring of the spy hole in the side of the cask with the pod auger. Plugs would then be cut out of wood. The plugs would be tapped into the spy and bung holes and the cask would be ready for use.
The final step was the boring of the spy hole in the side of the cask with the pod auger. Plugs would then be cut out of wood. The plugs would be tapped into the spy and bung holes and the cask would be ready for use.
![]() Casks were not the only product of the cooper. He also made all kinds of containers.
Casks were not the only product of the cooper. He also made all kinds of containers.
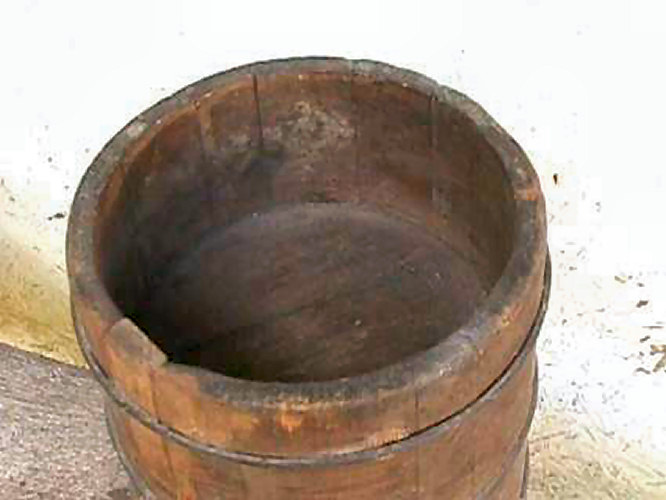
![]() A cooper might make nothing but containers other than casks. In that case, he was called a white cooper. The kinds of things the white cooper made included: buckets, piggins and peck/half peck measures, in which the ‘head’ was installed part way between the two ends. The head was so positioned so that two different dry measurements could be obtained from the single cask, such as shown in the illustration below.
A cooper might make nothing but containers other than casks. In that case, he was called a white cooper. The kinds of things the white cooper made included: buckets, piggins and peck/half peck measures, in which the ‘head’ was installed part way between the two ends. The head was so positioned so that two different dry measurements could be obtained from the single cask, such as shown in the illustration below.

![]() The white cooper also constructed items such as butter churns, pitchers and even cups or mugs. Anything that was constructed in the basic cask shape, and would be used to ‘contain’ some liquid or dry commodity would be made by the cooper or white cooper. The white cooper even made items such as a sieve or temse because of his knowledge and ability to bend and connect wood strips. The white cooper even made military drums.
The white cooper also constructed items such as butter churns, pitchers and even cups or mugs. Anything that was constructed in the basic cask shape, and would be used to ‘contain’ some liquid or dry commodity would be made by the cooper or white cooper. The white cooper even made items such as a sieve or temse because of his knowledge and ability to bend and connect wood strips. The white cooper even made military drums.
![]() It can easily be seen that because plastics and similar materials for constructing casks and other vessels were not available in the 18th and 19th Centuries, the cooper would have been a valuable craftsman in the community.
It can easily be seen that because plastics and similar materials for constructing casks and other vessels were not available in the 18th and 19th Centuries, the cooper would have been a valuable craftsman in the community.